Start using the Job Runner today
August 30, 2016 /
0 comments / in
General
/ by Luke Williams
How do you handle big, time consuming, scripted jobs in the HyperPoint Scripting Service? When an operation consumes the single-threaded HSS process for longer than desired, other scripts may not execute in a timely fashion.
Do you want to utilize custom .NET assemblies from within CygNet’s VBScript environment?
What if you could do both, right now, from the HSS, with a few simple lines of script?
Good news. You can!
Let’s discuss how easy it is to get stared with the Job Runner.
In case you are not yet familiar with the Job Runner, check out Walter’s announcement of its release here.
So what can Job Runner do? The better question is what can’t it do?
All you need to know about Job Runner is covered in the fantastic Job Runner Help file (included with the install) but here are some snippets for easy reference.
- Use the Job Runner to improve the efficiency of an HSS by taking long-running scripts and having them run on multiple concurrent threads. Yay!
- Studio screens not being as responsive as you would like during script execution? Improve responsiveness of a Studio Screen by executing script activities on a thread separate from the UI thread.
- Want to execute methods on a .NET assembly in the HSS and/or Studio? Feel free!
How does Job Runner work?
You’ll have to ask Walter and/or Blake if you want the down and dirty specifics, but for our purposes, let’s go with, the Job Runner executes a VBScript or a .NET assembly method on a separate thread and stores status so you know if the work was completed successfully or not.
Keep in mind that because the Job Runner uses a separate script engine it will not have access to shared objects in the HSS or Studio (like the Facilities or Points object) unless you make sure to include them.
For this example, we’ll use Job Runner to run a VBScript stored in a .vbs file on our local machine.
In total we will need three points for Job Runner to execute a .vbs file on the local machine.
- An HSS point with the VBScript to be run
- A trigger point (to be used for automation)
- A status point in the UIS to display the status of the job
This is a fairly common usage for Job Runner and is probably the one most likely to have immediate applicability in your system, this example will cover just one possible configuration method; we could use Job Runner to execute a script stored in an inactive HSS point, a .vbs file stored in the BLOB, or we could be calling a .NET assembly method. We don’t need the trigger point if we are using Job Runner outside of CygNet (we could simply add the job to Windows Scheduler as part of a batch file, for example), and the status point is optional as well. Really we could do with just two HSS point, the script, and the trigger, though being able to check on the status of each running job is helpful so we’ll leave it here.
CygNet Job Runner offers a lot of flexibility and can be adapted to your specific use cases.
For our scenario, we have created a CygNet Designer blueprint, and want to run blueprint validation on a schedule to ensure our system remains within our blueprints defined parameters.
Our .vbs file contains the CygNet Designer blueprint validation script. The script we are executing is shown below.

CygNet Designer Validation Script
Don’t know about CygNet Designer? Check out Walter’s announcement post about it here.
CygNet Designer was also featured as a free full-day class during this years WESC.
Using the Job Runner to execute this task instead of the HSS, will free the service to continue daily operations while the potentially lengthy blueprint validation job runs in a separate thread.
On to the Job Runner example…
I have included screenshots and explanations of each required section, and all scripts are included in a text file at the end of this post.
We already have the script we want to run on a local machine, next we need to create an HSS point with the Job Runner script.
The HSS point that contains our Job Runner script is called JOBRUNNER_SCRIPT.
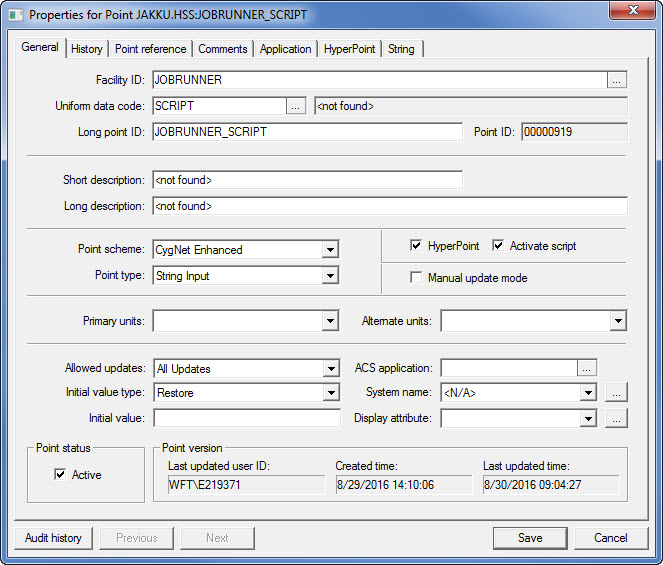
Job Runner HSS Point Properties
The Point properties can be configured the same as any other HSS point.
Let’s look at the HyperPoint tab and talk about the actual Job Runner script.
We’ll want the Job Runner object to persist beyond the scope of a single procedure so we need to make sure and declare the Job Runner object in the Declarations section of the HSS point.
Otherwise, Job Runner will go out of scope after it executes the job, and close itself (even if the job is still processing).
We declare the Job Runner object in the Declarations section.

General Declarations
For the OnInitializeEx event of the HSS point, we add a point to the Points object that will act as our trigger point.
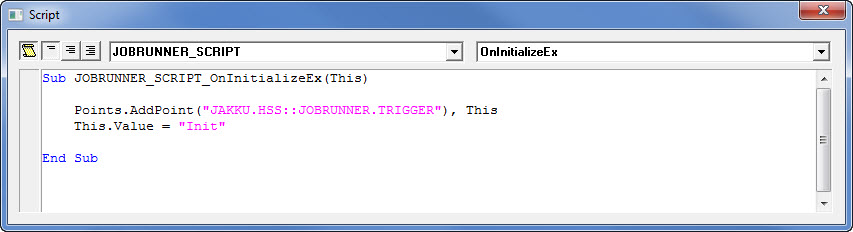
OnInitializeEx Event
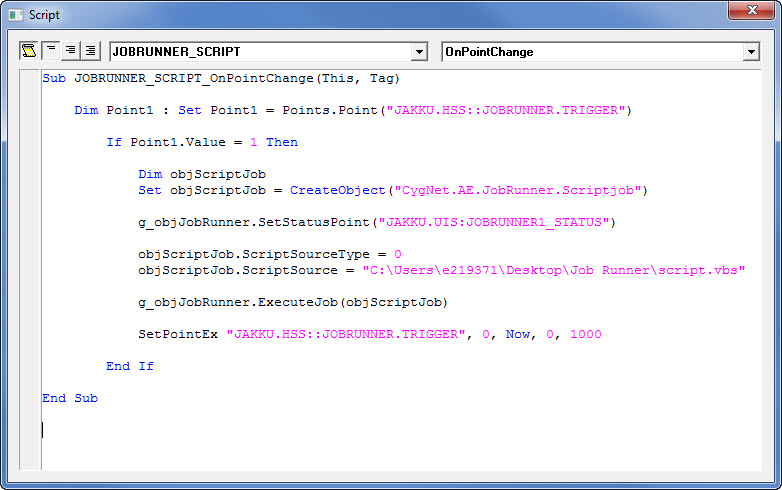
Next is the OnPointChange event where we add our Job Runner script.
The Job Runner script is only a small handful of lines, and we’ll walk through each section.
Dim Point1 : Set Point1 = Points.Point(“JAKKU.HSS::JOBRUNNER.TRIGGER”)
This line simply assigns our trigger point to the variable Point1.
Dim objScriptJob
Set objScriptJob = CreateObject(“CygNet.AE.JobRunner.Scriptjob”)
We create a job for Job Runner using the ScriptJob object (we would use the Job object for a .NET assembly method).
g_objJobRunner.SetStatusPoint(“JAKKU.UIS:JOBRUNNER1_STATUS”)
Next we tell Job Runner which point it should report the status of the job to.
objScriptJob.ScriptSourceType = 0

objScriptJob.ScriptSource = “C:\Users\e219371\Desktop\Job Runner\script.vbs”
In the above two lines the source of the script is set (0 = local file system, 1 = the HSS, 2 = BSS file) and it’s location.
g_objJobRunner.ExecuteJob(objScriptJob)
Finally we tell Job Runner to execute the job.
SetPointEx “JAKKU.HSS::JOBRUNNER.TRIGGER”, 0, Now, 0, 1000
After the job is executed we set the value of the trigger point back to 0.
In this example, we wrapped the script inside of an IF statement that resets our trigger point after the job is executed.
The full script inside this event can be seen below.
OnPointChange Event
In this example, the default value of the trigger point is 0, and when we want our script to run we edit the value of the trigger point (which is being monitored by the Job Runner points OnInitializeEx event) to 1. Once the job is started, we edit the value of our trigger point back to 0.
We can use this trigger point in combination with the MSS Set Point Task to automate when we want our script to be run.
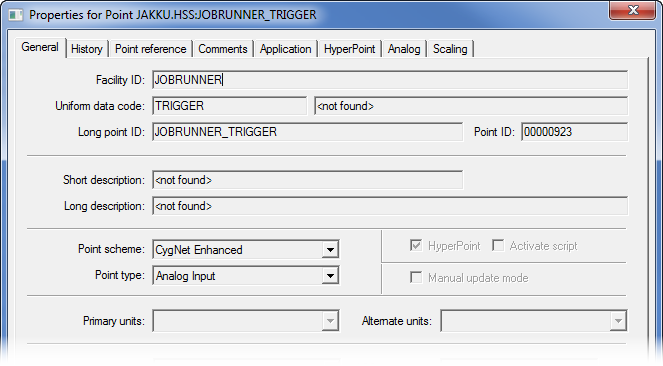
Job Runner Trigger Point
You could also edit the trigger value manually, or set the value through a button in Studio.
We’ll want to create a Point that we can use for Job Runner to report its status to.
Here the idea is to have our UIS display the value of the job status. The Job Runner simply creates a job that you can ask it for the status of. The Job Runner can start up multiple jobs and is responsible for tracking the status of any jobs it’s started. In this case we are only creating one job, but we want to be able to track the status of the job, creating a status point allows for Job Runner to have a place to report to.
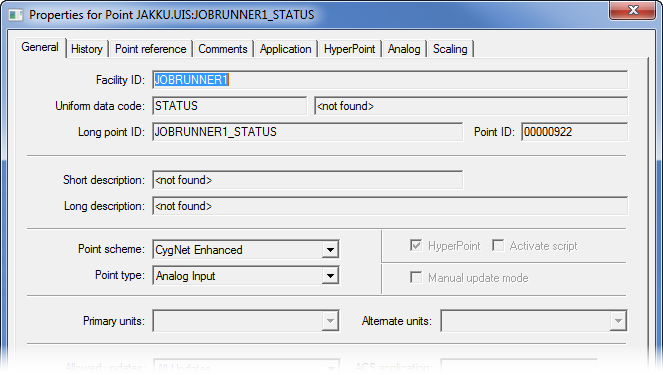
Job Runner UIS Status Point
That’s it! We can edit the value of our trigger point and the Job Runner will be called to spin up a job for our CygNet Designer validation to be processed in a separate thread. We will get feedback about the status of the job in our status point in the UIS.
This is really just the tip of the iceberg and we haven’t even touched on .NET assembly methods, Job IDs, executing a script stored in an inactive HyperPoint, logging, troubleshooting, and more. This post should hopefully be enough to get you started and feel free to ask questions.
If you don’t yet have the CygNet Job Runner feel free to get it from the CygNet Download site.
You can find a copy of the scripts, here.
Share this entry