Using Excel’s conditional formatting to build better reports
April 12, 2015 /
0 comments / in
Applied Engineering
/ by Walter Goodwater
The Report Module is designed to be a simple, user-friendly tool for creating reports in Excel or PDF. However, the needs of some users require some advanced configuration. This article is going to cover the details of using the report template file to leverage Excel’s powerful conditional formatting feature.
Template file
Most users don’t even need to know the report template file exists. It is used by our code libraries to take raw data from CygNet and format in Excel and PDF. It is described in detail in the Report Module documentation.
All conditional formatting for your report will be configured in the report template file. By default, all reports use the same template which is identified in the Report Module configuration. Typically this file lives in SITE.STORAGE\Reporter\Template\template.xlsx.
If the conditional formatting you wish to apply to your report applies to all reports you will run in your system, you can simply modify your default template. More likely, you will have report-specific conditional formatting. In those cases, you will need to specify a different template file per report.
The sections of the report template file are separated by keywords such as #EndReportHdr# or #SubSection#. It is important to note that rows containing these keywords will be removed during report processing. This can have an effect on your conditional formatting.
Conditional formatting for column
A common use for conditional formatting is to call out noteworthy values in a column. You may be interested in seeing Volume for 100 meters, but you want to see the highest and lowest highlighted. Or you want to make sure that if your Static Pressure is over a certain threshold it is called out specifically in your report. These would be cases where you would want to configure conditional formatting for a particular column.
Step 1: Determine which column you want to format
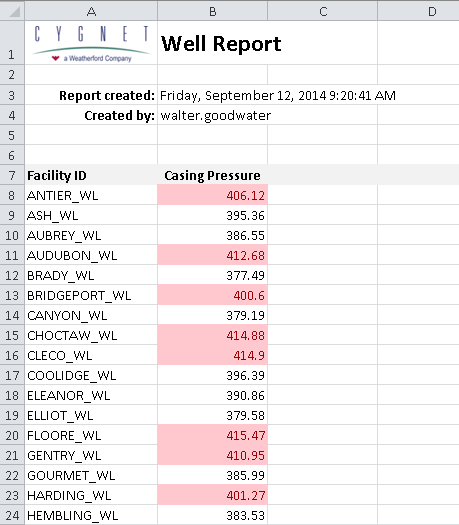
In your template file for this report, determine which column will have the data you want to format. For example, if you want to format based on Casing Pressure and that will be the second column in your report, select row B:
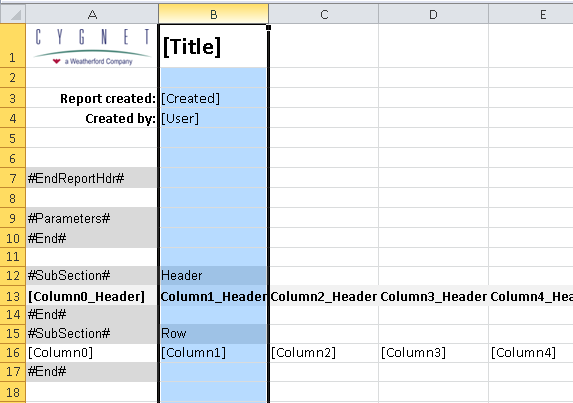
You’ll see that we’re including rows from the Report Header. We’ll account for those in our conditional formatting rules.
Step 2: Configure conditional formatting
Select Conditional formatting from the Excel ribbon under Home / Styles then select New Rule:
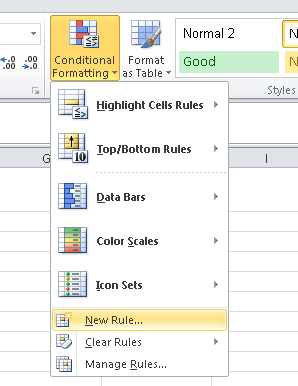
In the New Rule dialog, select Use a formula to determine which cells to format.
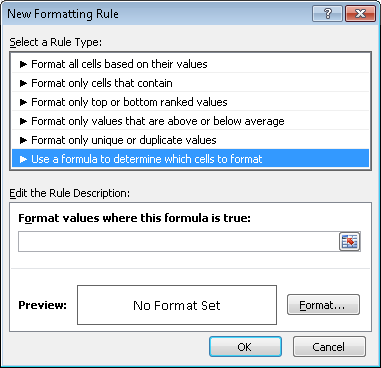
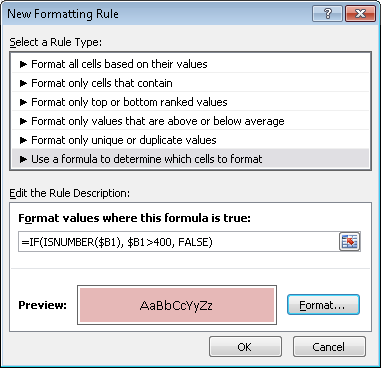
Here we need to enter a formula to determine which cells to conditionally format. For this example, we are going to format all cells that contain values greater than 400.
In Excel formula syntax, we can write this simply as:
=$B1>400
This will take the value of each cell in row B and if the value is greater than 400, will apply our formatting. However, remember that we don’t just have values in this column; we have some cells from the Report Header, and we have the column header. Since those are strings, the above comparison will not return the results we want.
So we need to enhance our formula to avoid the cells we don’t want to compare:
=IF(ISNUMBER($B1), $B1>400, FALSE)
This will first determine if the cell has a numeric value in it. If it does, it will apply our check; otherwise, it will just return false. This will exclude the rows we aren’t interested in conditionally formatting.
Step 3: Pick format
Now that we’ve written a formula to format certain cells, we need to determine how to format them. Click the Format… and choose whatever formatting you determine is appropriate for your report.
We are going to change the cell’s background color to red, though Excel provides many other options.
Step 4: Upload template and test report
Now that your template has the correct conditional formatting, you need to upload it (if you are using the STORAGE service to store your templates) and then run your report. Here is what our Well report looks like with our conditional formatting:
Conditional formatting for row
Conditional formatting for rows is similar to columns but with a significant additional consideration: row numbers in your template do not necessarily correspond to the rows in your published report.
Let’s look back at the template.xlsx file. Remember those keywords like #EndReportHdr#? Those rows will be removed from the final report.
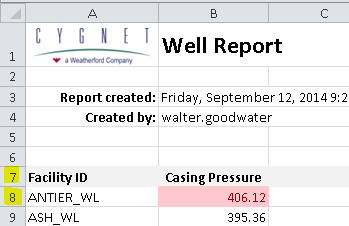
So using this template as an example you see the column headers are defined on row 13 and the row contents are defined on row 16:
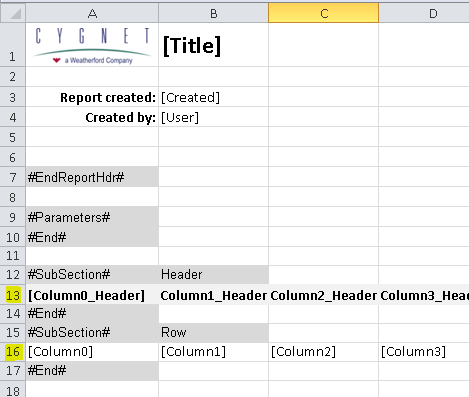
However, in the final report, since we strip out the section keyword rows, the column headers will be on row 7 and the data will start on row 8:
Keep this in mind if you are using absolute row numbers in any of your row-based conditional formatting.
For examples of using conditional formatting to change row formatting, see the default template. It uses conditional formatting to format the column headers and alternate row colors.
Share this entry