Canvas Preview: Hyperlinking
December 15, 2017 /
0 comments / in
General
/ by Luke Williams
If you’ve been using CygNet for even a little while you will have heard the discussion and seen presentations about the next CygNet HMI, Canvas. With its impending official release this fall we continue this multi-part series by introducing you to some of Canvas’ new and exciting features.
The last post introduced you to Relative Facilities and discussed how it can be used to allow for more aware and dynamic screen design.
In this post, we’ll discuss hyperlinking between screens. This is a familiar feature for Studio developers, though there are a few new Canvas-specific enhancements we want to highlight.
The idea of hyperlinking should be familiar. A user clicks a button to that links to a new screen. In the past this required a section of code to make new screens from a hyperlink modal, otherwise, the default action was to simply open the new screen.
Let’s begin with a simple example that illustrates the basic function of hyperlinking.
Simple Hyperlink Example
Above, the user clicks the button and another screen opens on top of it. Simple, effective, and easy to set-up.
Hyperlink Modes
In Canvas, rather than just having one way to open a new screen we wanted to offer some more variety and navigation choices. Instead of just one open mode, like the traditional method shown above, we have four! Let’s walk through each and show you how they function.
Open
This is the standard functionality that is available in Studio you’ll be familiar with and the one used in the example above.
Open and Close
Instead of opening the new screen on top of the screen that was used to launch it, close the screen the user clicked the button on, and open another screen. This function is available in Studio as well.
Hyperlink – Open and Close
This option is subtle and functions almost the same as ‘Open’ the difference being that instead of two screens open now, there is still just one.
Replace
What do you do when you want a screen to not open in a new window, but rather replace the screen running in the same window? Easy, use the Replace option. This function is available only in Canvas.
Hyperlink – Replace
Notice that instead of another window being created the screen running inside of the window simply gets replaced by the new screen.
Replace with Navigation
The fourth option and the one we’re most excited about is the ability to Replace a screen in the same window, as shown above using the ‘Replace’ option, but instead of the original screen going away, simply add a navigation bar to the top of the screen and move back and forth between screens. This function is new (and awesome!) and available only in Canvas.
Hyperlink – Replace with Navigation
This can be especially powerful when wanting to create specific workflows or application-like screens that act as a walkthrough for a user.
In the example above, a user is asked for their name, location, and phone number, when complete, each entry is stored in the Global Dictionary (covered in the previous post) and can be written to a database, Point, Facility, or out to a file (or any other place you can think of for that matter). The example above is actually made up of four different screens, as the user clicks the ‘Next’ button the current screen is replaced by the next one, a navigation bar appears that allows the user to move back and forth between these loaded screens. The Home button allows the user to return to the original screen at any time.
In this way, tabs become less necessary, and when combined in Canvas View and the tabbed/docked nature of WPF applications, this becomes even more powerful when considering screen building and design principles. We’ll go into more examples of Canvas View and how you can dock/tab/pin screens and create customizable workflows in the read-only client, in a later post.
Scripting a Hyperlink
So how does all of this fancy hyperlinking work? You’ll be happy to read that it is incredibly easy and all of the examples above can be done with one or two lines of code.
The first thing we need to do is apply the path of the screen we want to open (regardless of the way we want to open it).

Screen Path
Do this by simply passing in the screen location into a variable, in this example called ‘screenPath’.
The Hyperlink option is actually a method of the screen and not the Button. To start, we reference the Global Objects, and then the Screen, and finally the Hyperlink Method.
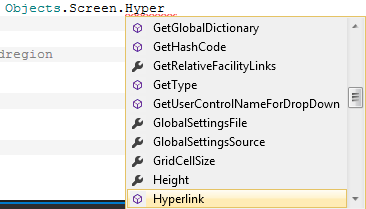
Screen Hyperlink Method
Notice we have elements of the IDE built right into Canvas, including dropdowns with methods and properties of objects on the screen.
Once we have the Hyperlink method select we can pass in our parameters.

Hyperlink Intellisense
Thanks to the Intellisense built into Canvas we can see that the Hyperlink method needs a path, a file source, and hyperlink mode, the other parameters are optional. We’ll pass in the screen path string we created earlier, set the file source to either a local file or a BLOB, and finally specify which hyperlink action we want.

Finished Hyperlink Code
You can see the four modes, select the one you want and that’s it.
Aside from the optional file path (which you could obviously do in-line) hyperlinking only requires a single line to configure.
Hyperlinking is a powerful tool that can be combined with the Global Dictionary and other inter-screen communication concepts to make your screens really more robust and configurable.
Share this entry